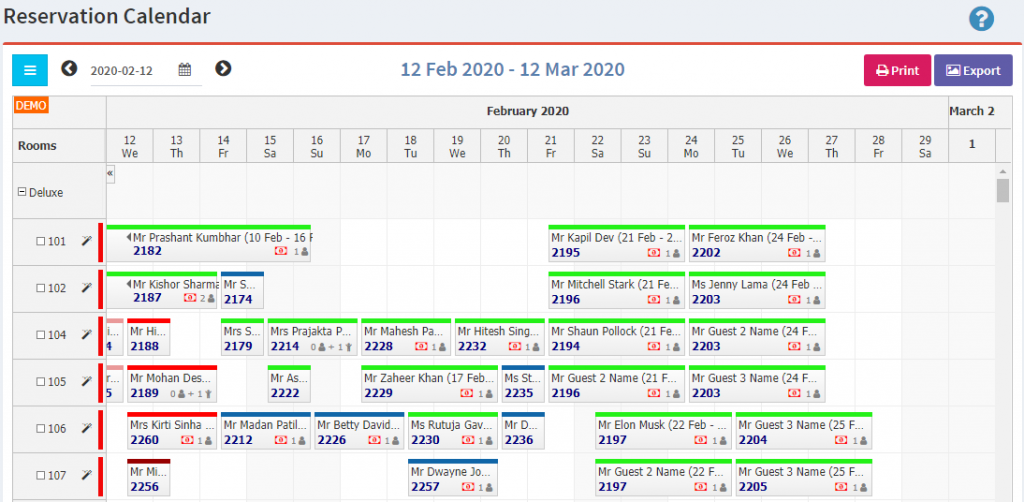
Reservation Calendar is a module related to all Front Desk operation. We have designed this calendar with advanced functionalities like “auto-assign”, “drag and drop”, etc. The view of this calendar is date wise and rooms listed under respective categories indicating their features as well, all In-house rooms are displayed but for Due In and future reservations once you assign rooms they are displayed here.
Now we will learn about each functionalities in details:
- “Reservation Calendar” menu is given under “Front Desk” menu.

- After clicking on “Reservation Calendar” you can view the same as shown below
- Click on
 button for the below listed functionalities.
- Auto assign all Un-Assigned – This option will tell you the count of un-assign rooms for same day arrival. Once you click on this option, arrival list will appear as shown in below screen shot.
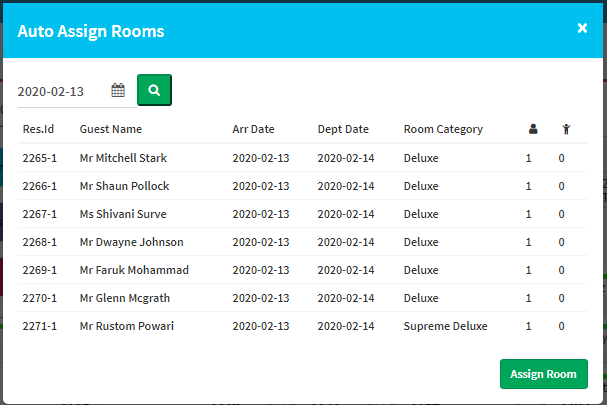
Then click on “Assign Room” button to assign rooms, once you click on this system will randomly assign room to all arrivals, later you may change according to your requirement.
2. Manually assign all Un-Assigned rooms – After you click on this option the same day arrivals will be listed in a pop up block where you can assign room individually from the “Room No.” Column. Refer the below screen shot.
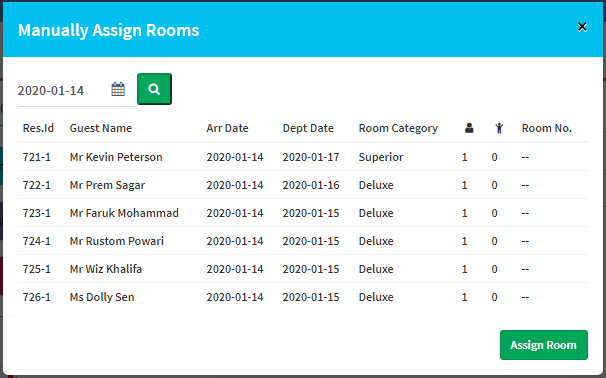
After assigning rooms all reservation will be displayed in the calendar, also future reservation rooms can be assigned, click on the date selection to select date to render the reservation list then follow the same process and assign rooms.
- Un-assign Room – A room can be un-assign till it is not shown check-in so to un-assign a room select the block and click, you will get two option “Go to Reservation” and “Un-assign room”. Click on Un-assign option and room will get released from that room, if you click on “Go to Reservation” system will render you to Reservation page.
- Drag & Drop – This functionality makes your work easy for room shifting, changing room assignment, etc. You only need to select the block, drag and place it to the room where you want to shift the reservation, accordingly new RTC will be displayed, in-case of different room category you can change the RTC based on whether it is upgrade or upsell. RTC that is shown by the system is the total of all nights and is excluding tax, if you change the RTC that should also be the total of all nights, on saving the change this amount will get distributed to per night (excluding tax). The reservation details can be viewed by clicking on “Go to Reservation” option.
- Create Reservation – Select the dates on calendar for which you want to create reservation, after selecting drag to no. of nights you want to book for, by default one night will get selected. On click two options will be displayed “Create Reservation” & “Courtesy Hold”, both options are for creating reservation but the difference is reservation is done from “Create Reservation” option then the booking is confirmed and if it is done from “Courtesy Hold” option then booking will be created as tentative.
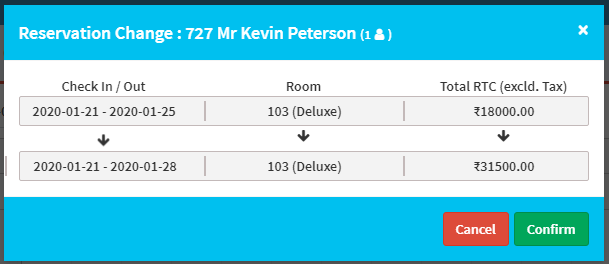
- Amend Reservation – All reservations those rooms are assigned will be displayed in Reservation Calendar, for amending reservation click on the last date and drag till where you want to extend and do the same for amending it to lesser night, for both cases after dragging system will update you with new RTC as shown in the below screen shot, on clicking “confirm” button reservation will get saved for new dates.
- Print & Export – Click “Print” button to print the calendar, once you click on print system will ask for the date range, by default two days will be selected and that is mandatory and click on print. Click “Export” button to download the calendar, please note it will be downloaded for the part that is displayed on screen.
- Notes – This means adding a comment to reservation. Select the block of that room where you want to add a comment related to that particular room reservation, a pop up will open pointing out to that room as shown in below screen shot.
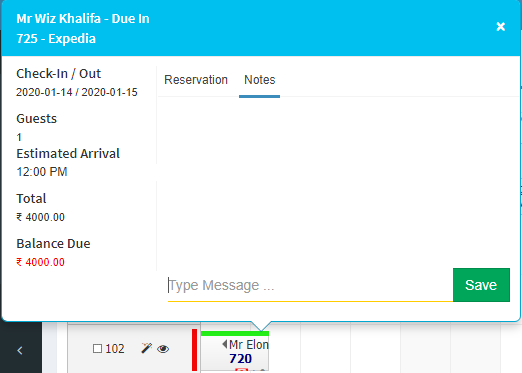
Here there are two tabs, “Reservation” and “Notes”. Reservation tab will give you options related to reservation activities as discussed above and Notes tab will allow you to add comment to that room. After adding comment in the blank space, click on “Save” button. Comment will get saved in reservation page which you can view in room level comment section.
******